Most times, we wish we could capture some stuff on our iPhone screens for memories, documentation, and entertainment’s sake hence the need for screen recording on iPhone.
In this article, we will teach you how to capture or screen record anything on your iPhone from gameplay, youtube videos, tutorials, etc.
With iOS 11 software and up, you now have a screen recording option.
You can also enable the microphone for voice over recording while in screen recording mode.
We will show you how to use, enable, and access these features.
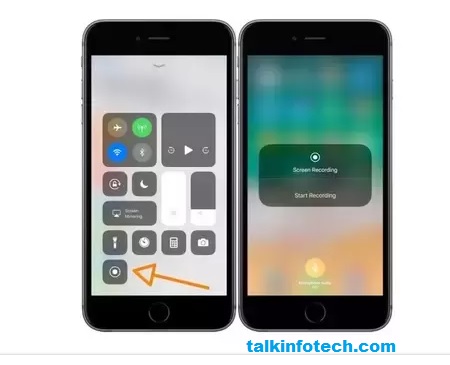
Once you enable screen recording the icon will show up in the control center where your flashlight, calculator, etc is located.
Remember in order to access the control center swipe from the bottom up however if you have the iPhone X you need to swipe down from the top right.
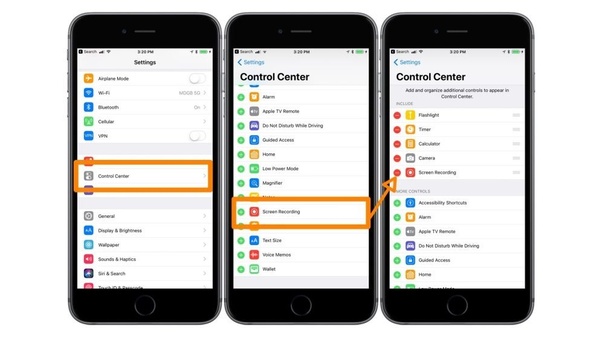
See below steps on how to enable screen recording on iPhone for you.
Step 1:
Tap on Settings and go to Control Center
Step 2
Tap on Customize Controls, scroll down and look for Screen Recording right there and tap on the plus sign beside it.
Please note that by default, the microphone is disabled.

SEE ALSO: How to Block and Unblock Friends on Facebook Easily
Step 3
Hence we have to turn the microphone on by pressing and holding down the round nob (see figure below) for a few seconds.

A small dialogue box pops up showing microphone symbol which by default is turned off. But you have to tap it so it can turn on
Step 4
Below on the appeared dialogue box is the Start Recording tab, if you press it, the phone will start recording automatically with both the screen activities and the audio.
Usually, when it starts recording, a red bar shows at the topmost part of the phone screen indicating the screen recording is ongoing.
You May Like This Also: Comparison of iPhone 7 vs iPhone 8 (Differences that…
We hope this was helpful. Or is there anything you feel we left out that will be helpful regarding screen recording on iPhone?
Kindly drop us a comment.

